LeiaPix, the AI-powered 3D Photo Revolution

Have you ever wished your photos could leap off the screen? Imagine capturing not just a flat image, but a scene with depth and dimension, something that feels truly alive. Well, that future is here with LeiaPix, an innovative app that harnesses the power of AI to transform your photos into stunning 3D experiences.
Piedmont Wonders: A Journey Through Italy’s Cultural Haven
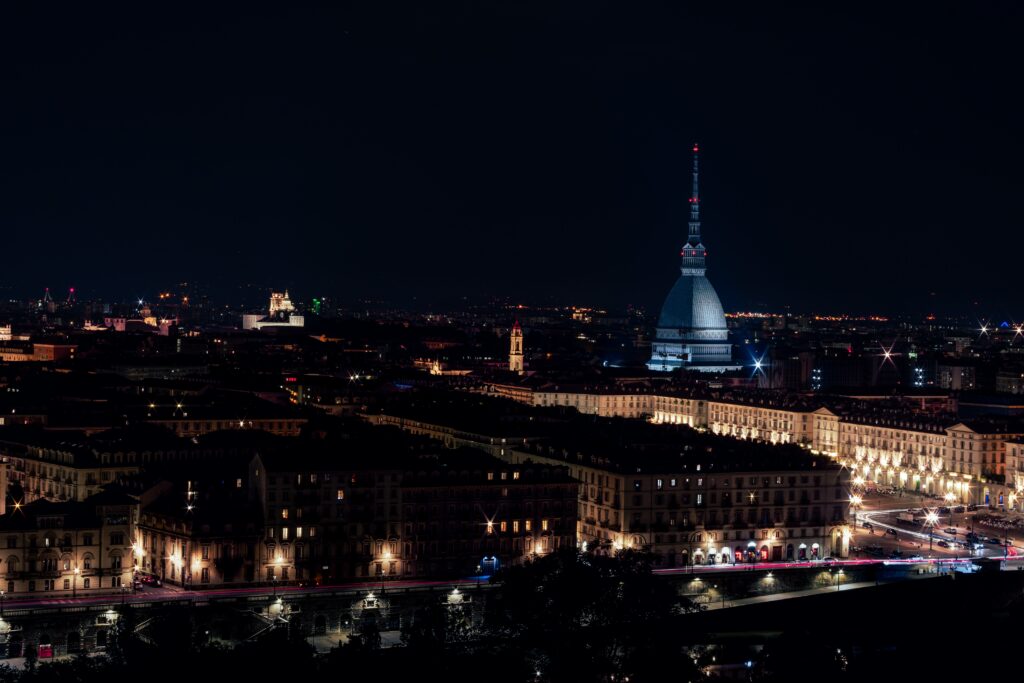
Step into the enchanting world of the Piedmont, Italy’s wonderland. Capture the majesty of Turin and the allure of…
Best Portable External Storage Drives

When it comes to storing and backing up important data, having a reliable and high-performing external storage drive is essential. Portable..
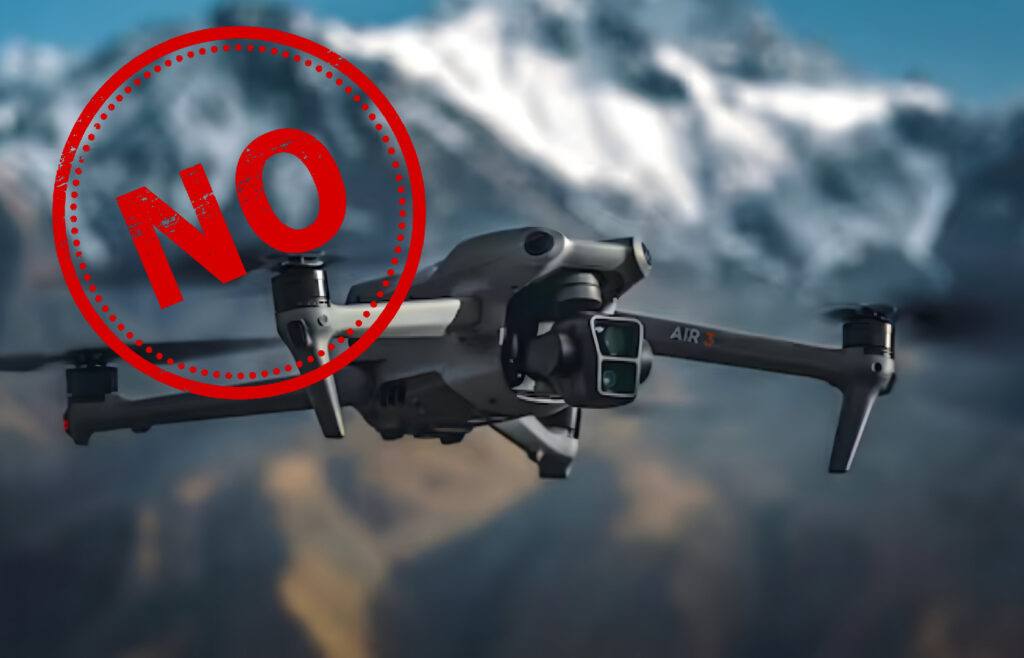
Mini 4 Pro by DJI: The Drone Revolution Continues!
Mini 4 Pro by DJI: The Drone Revolution Continues! Remember the Mini 3 Pro? DJI left us all gobsmacked with that one by packing a treasure trove of tech into a feather-light drone. Well, folks, fasten your seatbelts because the DJI Mini 4 Pro has burst onto the scene with an impressive list of upgrades. Sure, the camera might seem like déjà vu, but wait till you hear about those nifty omnidirectional obstacle sensors. They’re like the drone’s guardian angels, making sure it never hits a blind spot. And, if that’s not enough, we’ve got the cherry on top – ActiveTrack 360, allowing you to orchestrate epic camera moves while tracking your subject. Say goodbye to shaky shots! A Stylish Upgrade Now, let’s talk looks. The Mini 4 Pro is still a featherweight champion at under 250 grams, which means you can soar through the skies without the hassle of licenses or registrations in many regions. But here’s the scoop – it’s undergone a makeover. The forward- and rear-facing sensors have shifted positions to keep an eye on the sides, and the design has been given a modern twist. There are snazzier cooling vents, sleeker rear arms, and new landing feet at the front. Even the camera/gimbal shield got a makeover for your convenience. Plus, there’s a new propeller guard in town to protect those precious blades when you’re not in the air. And the camera? It’s still your trusty partner in crime, tilting up 60 degrees and down 90, and flipping 90 degrees to grant you full vertical resolution for your social media glory. Don’t fret about storage; this baby comes with 2GB of internal space and a microSD port for those “just in case” moments. But wait, there’s more! DJI has thrown in a $55 ND filter set for those sunny days, and an 18mm equivalent lens attachment for just $40. Beware, though, it might give your shots a quirky, fish-eye twist. There’s also the magic of DJI’s Lightcut, an editing app that sprinkles stardust on your videos for social media. No more downloading footage to your smartphone; it’s all done wirelessly. Performance That’ll Leave You Breathless Let’s talk performance. This little dynamo, armed with the same sensor as DJI’s Action 4, is your flying action camera. It’s lightweight, nimble, and doesn’t break the bank, unlike its high-end cousins. Zooming along at a nifty 35 MPH in sport mode, or a comfortable 26 MPH in regular operation, it can handle winds up to 24 MPH. It might look like it’s dancing in the wind, but your footage will stay rock-steady, thanks to DJI‘s gimbal and stabilization wizardry. Remember the Mini 3 Pro‘s blind spots? Say goodbye to those with the Mini 4 Pro’s omnidirectional sensors, inspired by the Mavic 3 Pro and Air 3. It’s like giving your drone an extra pair of eyes, and it’s backed by DJI’s APAS, offering automatic braking and obstacle dodging. Safety first, right? I took this baby for a spin among trees and potential snags, and yes, there were a few bumps and scrapes (oops!). Here’s what I learned: these sensors are sunshine-loving, so dim light is a no-go. Thick forest with fine branches? Nope, they can be tricky. And, oh, the drone is at its best when flying forward, a bit less so sideways, and not so great when flying in reverse. Lesson learned: obstacles can be a handful. But fear not, ActiveTrack 360 comes to the rescue! It adds cinematic flair to your subject tracking. It’s a tad confusing at first, but once you get the hang of it, it’s like painting a masterpiece. Draw a route on concentric circles, and watch your drone follow it, gracefully dodging obstacles. The only hiccup? Figuring out which way is forward can be a puzzle. Practice in an open space before taking it to the big leagues! And if you’re not in the mood for artistic flourishes, don’t worry! The Mini 4 Pro still has DJI’s automatic modes for social media savants – MasterShots, QuickShots, Panorama, and Hyperlapse. Plus, it’s got the Waypoint feature from the Mavic 3 Pro, allowing you to pre-program intricate drone maneuvers and play them on repeat. Fancy, right? Better Connectivity Than Ever Speaking of connectivity, the Mini 4 Pro boasts Ocusync 4 transmission, a technology we first fell in love with in the Air 3. It sends 1080/60p video up to 20 km (12 miles for our friends across the pond), even if your drone decides to play hide-and-seek behind obstacles. Trust me, this upgrade is a game-changer. No more video hiccups! Power That Keeps Going Now, for the power nerds out there – the standard 2,590 mAh Intelligent Flight Battery is a tad beefier than the Mini 3 Pro’s 2,453 mAh cell. But here’s the kicker: flight time remains a solid 34 minutes. In the real world, we squeezed out about 25 minutes of fun before the return-to-home warning chimed in. So, plan your adventures accordingly. And here’s a little secret – if you already own the Mini 3 Pro, your batteries are buddies with the Mini 4 Pro. It’s like a reunion of old pals. Unfortunately, our friends in Europe can’t enjoy the Plus batteries, which offer up to 45 minutes of flight, due to local rules. Sorry, Europe! Controllers That Up the Ante Let’s not forget the controllers! DJI gives you two options: the basic RC-N2, which requires your smartphone, and the RC2 with a built-in screen. These are equipped with DJI’s new Ocusync 4 transmission, so they’re a match made in heaven with the Mini 4 Pro. Camera Magic Last but not least, the camera. The Mini 4 Pro sports the same 1/1.3 dual ISO sensor as its predecessor, with a trusty 24mm equivalent lens and a fixed f/1.7 aperture. That’s a pretty hefty sensor for a drone of this size, just a smidge smaller than the Mavic Air 2S’s 1-inch sensor. But what sets it apart?
Aosta Valley: Capturing Alpine Splendor and Medieval Majesty
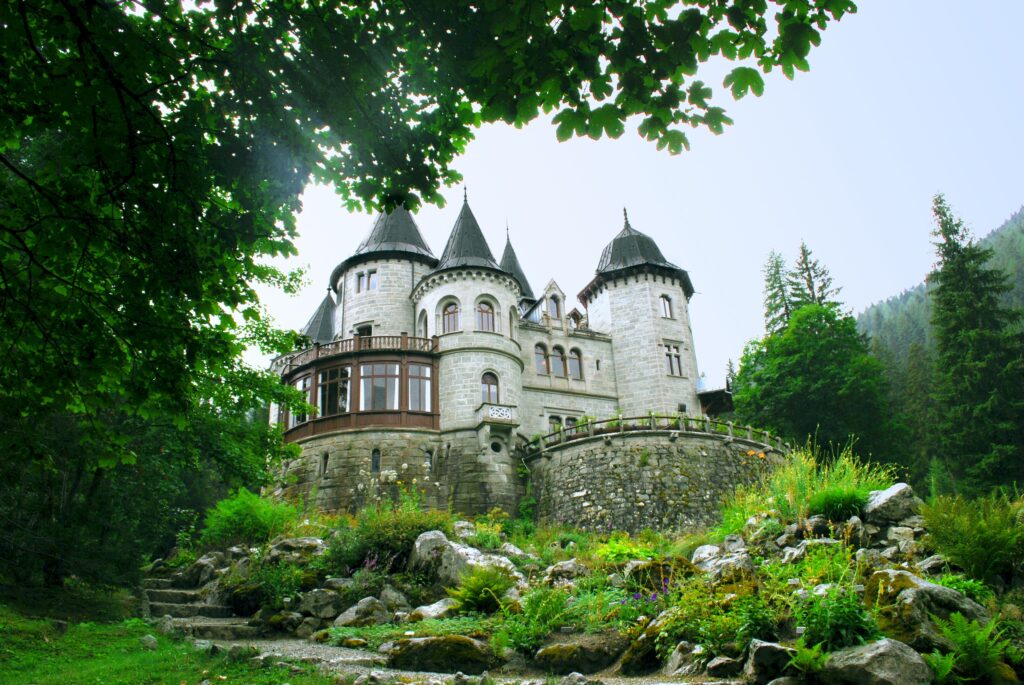
Aosta Valley: Capturing Alpine Splendor and Medieval Majesty Castle of Queen Margherita of Savoy, Valle d’Aosta, Italy Welcome to Aosta Valley, a picturesque region nestled in the heart of the Italian Alps. With its rich history, stunning landscapes, and cultural treasures, Aosta Valley offers an unforgettable experience for every traveler. In this guide, I will take you on a virtual tour of the most remarkable places this region has to offer, sharing valuable tips for content creators to produce captivating travel content. Discover the following enchanting destinations in Aosta Valley: Castle of Queen Margherita of Savoy: A regal gem perched in the town of Sarre, showcasing neo-Gothic and neo-Renaissance architecture. Verres Castle: A medieval marvel in the village of Verres, steeped in history and legends from the 14th century. Val Ferret: An alpine valley on the Italian-Swiss border, offering breathtaking hiking trails and mesmerizing landscapes. The Forte di Bard: A majestic fortress transformed into a cultural hub with museums, art exhibitions, and events. Gran Paradiso National Park: Italy’s first national park, a wilderness teeming with wildlife and awe-inspiring scenery. Baths of Pré-Saint-Didier: A rejuvenating retreat with thermal waters and spa facilities, nestled amidst the mountains. Aosta: The regional capital, boasting Roman ruins and medieval architecture, creating a timeless charm. Mont Blanc: Western Europe’s highest peak, offering a thrilling challenge and stunning panoramic views. Mont Avic Natural Park: An untouched wilderness with glaciers, lakes, and dense forests, perfect for nature enthusiasts. Sanctuary of Notre-Dame de Guérison: A serene place of spiritual solace, perched on a hilltop overlooking the valley. Whether you are seeking history, adventure, or serenity, Aosta Valley has something to offer every traveler. As we delve into each destination, I’ll provide content creator tips, equipping you with the tools to craft engaging travel pieces and inspire your audience to embark on their own Aosta Valley adventure. So pack your bags, and let’s begin this unforgettable journey through the captivating Aosta Valley. WanderLens is an inspiring and captivating project dedicated to bringing the world’s most photogenic destinations to content creators enthusiasts and adventurers alike. Through a series of meticulously curated articles, WanderLens takes you on a global visual odyssey, revealing hidden gems and iconic landmarks in every corner of our planet. 1. Castle of Queen Margherita of Savoy: A Royal Gem Amidst the Mountains Perched on a picturesque hill in the charming town of Sarre, the Castle of Queen Margherita of Savoy stands tall as an emblem of regal heritage. This enchanting castle was constructed in the late 19th century as a residence for Queen Margherita, who fell in love with the beauty of Aosta Valley. The castle’s architecture boasts a fusion of neo-Gothic and neo-Renaissance styles, showcasing elegant turrets, imposing battlements, and intricate detailing. Upon entering the castle, visitors are transported back in time as they explore the opulent chambers and halls adorned with lavish furnishings and historic artifacts. Each room tells a story of the queen’s life and her significant impact on Italian history. From the ornate throne room to the private quarters, every corner exudes an air of sophistication and majesty. Content Creator Tips: Golden Hour Glory: Shoot during the golden hours of sunrise and sunset to enhance the castle’s beauty with warm, soft lighting. Aerial Perspectives: Consider using drone footage to showcase the castle’s grandeur from unique angles. Time-Lapse Magic: Create mesmerizing time-lapse videos of the changing skies over the castle, highlighting its enduring presence. 2. Verres Castle: A Medieval Marvel Unveiled Situated on a rocky outcrop above the quaint village of Verres, Verres Castle is a medieval masterpiece that has withstood the test of time. Dating back to the 14th century, this fortress played a crucial role in protecting the valley and its inhabitants during turbulent times. Today, it stands proudly as a testament to the region’s rich history. As you approach the castle, its imposing walls and fortified towers evoke a sense of wonder and intrigue. Upon entry, visitors are greeted with a maze of courtyards, secret passages, and dungeons, each harboring secrets of the past. The castle’s strategic location offers breathtaking views of the surrounding valley, making it a haven for photographers and history enthusiasts alike. Content Creator Tips: Play with Symmetry: Utilize the castle’s symmetrical elements to create visually appealing photographs and videos. Incorporate Local Culture: Include shots of traditional events or local festivals if your visit coincides with them to add cultural context. Haunting Night Scenes: Experiment with long-exposure shots during the night to capture the castle’s mystical ambiance under the moonlight. 3. Val Ferret: Nature’s Serenade in Val Ferret Nestled between the towering peaks of the Mont Blanc Massif and the Grand Combin, Val Ferret is a pristine alpine valley that embodies the essence of untouched natural beauty. Located on the Italian-Swiss border, this enchanting retreat offers a sanctuary for nature lovers and adventure seekers alike. The valley’s idyllic landscape is adorned with emerald-green meadows, cascading waterfalls, and meandering streams, making it a paradise for hikers and outdoor enthusiasts. Various well-marked trails cater to all levels of experience, providing the perfect opportunity to immerse oneself in the tranquility of nature. Content Creator Tips: Showcase Hiking Trails: Document your journey along scenic hiking trails, highlighting the breathtaking landscapes encountered along the way. Wildlife Encounters: Patience is key in capturing the diverse wildlife inhabiting the valley. Have your camera ready for unexpected encounters. Timelapse the Stars: Val Ferret’s remote location provides excellent opportunities for capturing stunning night sky timelapses. 4. The Bard Fort: A Majestic Citadel of Art and History Dominating the landscape from a strategic vantage point, the Forte di Bard stands as a testament to the region’s storied past. This formidable fortress, once a crucial stronghold along the historic route between Italy and France, has been transformed into a cultural hub that bridges the gap between history and contemporary creativity. Visitors to the Bard Fort are treated to a mesmerizing blend of art, history, and architecture. The complex houses several museums and art exhibitions, showcasing a diverse collection of artifacts
DJI Air 3: A Marketing Move, Not an Innovative Drone
DJI Air 3: A Marketing Move, Not an Innovative Drone DJI has finally unveiled its latest drone, the Air 3, after much speculation and anticipation. As a supposed successor to the Air 2S, the Air 3 promises several upgrades and new features. However, upon closer examination, it becomes evident that this release is more of a marketing move rather than a truly innovative product. In this article, I will dissect DJI Air 3‘s features and discuss how DJI seems to be rehashing existing ideas without bringing any groundbreaking innovations to the table. But first, let’s watch the trailer launch: Underwhelming Camera Upgrades One of the most hyped aspects of the Air 3 is its two-camera system, offering a main lens with a larger f/1.7 aperture and a 70mm telephoto lens with a smaller f/2.8 aperture. While this configuration does provide some versatility in shooting, it lacks the wow factor that one would expect from a new flagship drone. The image quality is still commendable, but the fact that DJI has chosen to reuse the same telephoto lens found in the recent Mavic 3 Pro raises concerns. By recycling components from other models, the Air 3 fails to impress with a lack of innovation in its camera system. As a result, the drone ends up feeling like a compilation of previously seen features rather than a groundbreaking new release. Flawed Telephoto Camera and Filming Experience While the lens offers some new creative possibilities, it also has its downsides. The footage from the camera can look flat, lacking the stunning bokeh and separation between foreground and background that one would expect from a dedicated telephoto lens. Additionally, switching from the main lens to the telephoto lens may force users to increase the ISO, leading to more noise in the footage. This minor flaw takes away from the overall filming experience, and one cannot help but wonder why DJI did not incorporate after-market ND filters to address this issue. Even better, the inclusion of built-in ND filters or a variable aperture system could have made the drone more appealing and user-friendly. Lack of Exciting New Features Beyond the camera upgrades, there is a lack of excitement surrounding the Air 3’s other features. The improved connectivity with Ocusync 4 and the new controller does little to set it apart from previous models. DJI’s OcuSync system has already proven its reliability, and connection issues are a thing of the past. Battery life remains relatively unchanged, hovering around 45 minutes, which is standard for most of DJI’s drones. Although the drone world expected a breakthrough in battery technology, the Air 3 merely follows suit with its predecessors, leaving consumers underwhelmed. Disappointing Color Profile and Missing 48MP Mode Another drawback is the replacement of the D-Log color profile with D-Log M, a less flat variant. While D-Log M may be easier to color grade, it comes at the cost of noticeably reduced dynamic range. This change leaves drone enthusiasts disappointed as they lose the option to choose between the two color profiles that cater to different shooting preferences. Furthermore, DJI’s claim of a 48MP photo mode remains elusive, with users unable to locate this feature in the drone’s menu. The absence of this mode leaves a sense of incompleteness and indicates that the Air 3 may not have been thoroughly optimized before its release. Most popular: How to beat the Winter Blues to get motivated again The Power of ChatGPT for Streamlining Business Processes How to create a professional-looking video on a budget Come sconfiggere il fenomeno “Winter Blues” e recuperare la motivazione Crea un video professionale con un budget limitato Il Potere di ChatGPT per Ottimizzare i Processi Aziendali Most Recent: What is a Business Plan and How to Create One Il miglior microfono per i Content Creator: Hollyland Lark M1 Rivoluziona i tuoi video con Rask AI: lo strumento di traduzione e doppiaggio basato sull’IA. Revolutionize Your Video with Rask AI: The AI Translation and Dubbing Tool The Evolution of E-commerce: Unveiling the Four Distinct Models The Best Microphone for Content Creators: Hollyland Lark M1 Review Pros and Cons of the DJI Air 3 Drone: Pros: Capable Camera System: The Air 3 features a two-camera setup with a larger f/1.7 aperture main lens and a 70mm telephoto lens, offering versatility and good image quality in low-light conditions. Improved Connectivity: Ocusync 4 ensures a stable and reliable connection between the drone and the controller, providing seamless control during flights. 4K 60fps Filming: The drone allows smooth 4K video recording at 60 frames per second without cropping, delivering high-quality footage for filmmakers and content creators. Decent Battery Life: With approximately 46 minutes of flight time, the Air 3’s battery life is suitable for most aerial photography and videography sessions. Audible Noise Reduction: Larger propellers result in a lower-frequency, less piercing sound, enhancing the overall flying experience. Cons: Lack of Innovation: The Air 3 disappoints with a lack of groundbreaking features, relying on reusing components and ideas from previous models. Flat Telephoto Camera Footage: The 70mm telephoto lens produces footage with limited foreground-background separation, affecting the bokeh effect. Switching lenses may require ISO adjustments, potentially introducing noise. Disappointing Color Profile: Replacing the D-Log color profile with D-Log M reduces the dynamic range, making post-processing less flexible for some users. Missing 48MP Photo Mode: Users report being unable to find the advertised 48MP photo mode in the drone’s menu, raising concerns about feature completeness. Iterative Design: The Air 3’s design closely resembles other recent DJI models, lacking a distinct identity and fresh design elements. Conclusion: A Capable yet Uninspiring Drone In conclusion, the DJI Air 3 is undeniably a capable drone that performs well in many areas. However, its lack of true innovation and reliance on rehashed ideas make it a rather uninspiring release. The drone market expected something groundbreaking, yet the Air 3 fails to deliver on that front. For the price tag of $1,099 or $1,349 for the Fly More
9 Landscape Photography Tips
9 Landscape Photography Tips It often happens that we find ourselves in front of a breathtaking panorama and we do not have adequate experience or enough knowledge on how to capture it best. In this article, I recommend nine “moves” that you can apply immediately, even if you are just starting out in this profession (or passion). Your shots will improve considerably. 1. Use a tripod It may seem obvious to many, but I still see people walking around, especially at night, taking pictures while holding the camera in their hand. Whether amateur or not, knowing how your camera works is essential, even for the simple fact that if you have invested money in buying a camera, you are surely interested in taking quality photographs. In landscape photography, the tripod is the first thing you should have, it is fundamental both day and night. The main reason is that in landscape photography, stability is very important to avoid any kind of noise. In fact, when we close the aperture, the amount of light that enters the camera is low, so to achieve a correct exposure in our composition, we need to lengthen the shutter speed. If we lengthen the shutter speed and do not use a tripod, even the simple movement we make when we breathe will result in a blurry final shot. Digital cameras, today, are very sensitive to movements. If you take pictures at times when there is little or no light (during sunset, sunrise, or at night), it is advisable to also get a remote shutter release button because even the simple touch and pressure applied to the shutter button on the camera will cause movement and therefore noise. If you do not have a remote shutter release button, you can also set the self-timer on your camera. 2. Give importance to depth of field When framing a landscape with your camera, always try to focus on as many elements as possible. Maximizing the depth of field helps to avoid parts of the landscape being subsequently blurred. The most immediate and simple method to do this is to close the aperture of our lens as much as possible (usually around f/11 – f/16) because the smaller the aperture, the wider the depth of field and consequently, more elements will be in focus in your scene. Always remember that having closed the aperture, less light will enter the camera, so you will need to adjust the other parameters for a correct exposure, i.e., the ISO and shutter speed. 3. Look for a focal point In any genre of photography, it’s always important to focus on a focal point, a detail, a subject, or anything that prevents the photo from being too static. In my opinion, in landscape photography, this advice depends on many factors, such as the final goal of our photo, the composition, and the emotion we want our shot to highlight and convey. One thing is certain, if the environment of our scene is very neutral, a focal point helps to give more dynamism to the composition, but also to guide the eye of those who will observe your photo. When you are struggling and there is no possibility of finding a focal point, use yourself within the composition, but be careful not to only concentrate on finding or including a focal point, but also on where to position it within the scene. The rule of thirds will certainly help you! 4. Use lines This advice follows the same goal as the previous point: to guide the observer’s eye through a focal point. A question you should always ask yourself when taking a landscape photo is “How do I guide the observer’s eye in this photo?” Therefore, if there is no focal point, we can follow the lines, if present, that guide and immerse the viewer in our composition, giving the photo depth. 5. Follow the weather Many inexperienced or beginner photographers see a sunny day and decide to go out and take photos because “it’s a beautiful day.” Nothing could be more wrong! Landscape photography has nothing to do with beautiful days; the best photos are always those where the weather is adverse. In fact, many professional photographers look at the weather before going to visit a place and take landscape photos. Strong winds, threatening clouds, storms, and the sun immediately after intense rain are the most beautiful moments to photograph because nature is unpredictable and gives unique and unforgettable scenery. If you are able to frame this spectacle, then you are on the right track. If you notice, the most famous landscape photographers of today are those who live near or in contact with nature or where the weather changes often and continuously. Therefore, in addition to looking for such situations, if they occur constantly, try taking them at different times; natural light changes every single moment, and in landscape photography, a photo is hardly the same as the previous or the next one. 6. Shoot during the Golden Hour The Golden Hours are the times when the light is soft, the colors are warm, the shadows are so long that they tend to disappear, and there is a good level of contrast. To simplify things a bit, we can say that in most situations, the golden hour corresponds to the light during sunrise and sunset. Try taking landscape photos during this phase of natural light; you will appreciate the magic and make your photos incredibly deserving. 7. Weighing sky and earth With this title, I’m not telling you to balance the portion of sky or earth within your composition, but rather the opposite. Observe the scene and see which element deserves more space in the photo. For example, if the sky is cloudless, shades are absent, and it is boring, place it in the top line following the rule of thirds, so the composition will have the remaining one-third. However, if you are in the presence of a sunset, or a game
The art of Travel Photography: How to tell a story through your lens
The art of Travel Photography: How to tell a story through your lens Travel photography is a unique and exciting way to document and share your adventures with the world. It’s a chance to capture the beauty, culture, and people of a place in a way that words cannot always do justice. Whether you’re an amateur or a professional photographer, the art of travel photography can be a rewarding and fulfilling pursuit. So, how do you tell a compelling story through your lens? Here are a few tips to help you get started: Plan ahead Before you embark on your journey, it’s important to have a clear idea of what you want to photograph and how you want to tell your story. Consider the destinations you’ll be visiting, the activities you’ll be participating in, and the people you’ll be interacting with. Think about the themes and messages you want to convey through your photos. This will help you focus your efforts and ensure that you capture the images that truly represent your experience. Be curious and open to new experiences One of the joys of travel photography is the opportunity to discover new things and capture them through your lens. Keep an open mind and be curious about the world around you. Look for unexpected and unique perspectives, and be willing to try new things. This might mean getting up early to catch the sunrise, or staying out late to capture the city at night. Pay attention to light and composition Light is one of the most important elements of photography, and it can make or break a shot. Pay attention to the quality and direction of light, and try to capture your subjects in the best possible light. Consider using techniques like backlighting, side lighting, and golden hour to add depth and dimension to your photos. In addition to light, composition is another important factor to consider. Think about how you want to arrange the elements in your frame, and use techniques like leading lines, rule of thirds, and framing to create balance and interest in your photos. Experiment with different angles and perspectives To add visual interest and depth to your photos, try shooting from different angles and perspectives. This might mean getting low to the ground for a worm’s-eye view or climbing up high for a bird-eye perspective. Experimenting with different angles and perspectives can help you capture unique and visually compelling images. Edit and curate your photos carefully After you’ve returned from your trip and have a collection of photos, it’s important to edit and curate your shots carefully. Choose the best and most representative images, and consider how they fit together as a collection. Think about the overall theme and story you want to tell, and arrange your photos accordingly. Conclusion The art of travel photography is about capturing and sharing the beauty, culture, and people of a place through your lens. By planning ahead, being open to new experiences, paying attention to light and composition, experimenting with different angles and perspectives, and editing and curating your photos carefully, you can create stunning and meaningful travel photography that tells a compelling story. Latest Articles: Adopt these 10 habits of highly Successful People and achieve the life you Desire Innovations of CES 2023 That Will Shape the Future How to create an engaging video script The Power of Mindset: How to Transform Your Life by Changing Your Thoughts How to Develop Communication Skills The Role of a Content Creator Discovering the World Through the Lens: A Photography Traveler’s Journey How to start in Videomaking The essentials of lighting for Videomaking The secrets of street photography: Capturing wonderful moments on the go
Discovering the World Through the Lens: A Photography Traveler’s Journey
Discovering the World Through the Lens: A Photography Traveler’s Journey As a photography traveler, the journey of discovering the world through the lens of a camera is one that is filled with endless possibilities and endless opportunities for growth. Whether you are an amateur photographer just starting out on your journey or a seasoned professional looking to explore new horizons, the world of travel photography is one that is truly rewarding and enriching. Here are a few tips to help you get started on your own journey of discovering the world through the lens: Start by finding your photography style Before you set out on your journey, it’s important to have a good understanding of your own personal style and interests as a photographer. Do you prefer candid, natural shots or more posed and stylized images? Are you drawn to landscapes or portraits? Understanding your own style and preferences will help you focus your efforts and capture images that truly represent your vision. Pack the right equipment As a travel photographer, it’s important to have the right equipment to capture the best possible images. This might include a high-quality camera, a range of lenses, and other accessories such as tripods, gimbal if you create video, filters, and memory cards. Make sure you have everything you need before you set out on your journey, and be prepared to adapt to different shooting conditions as you go. Get to know your destination Before you arrive at your destination, do some research and get to know the place you’ll be visiting. This might include looking at travel guides, reading about the local culture and customs, and seeking out recommendations from other photographers or locals. The more you know about your destination, the better prepared you’ll be to capture its unique beauty and culture through your lens. Experiment with different perspectives One of the keys to capturing great travel photography is to experiment with different perspectives and angles. This might mean getting up close and personal with your subject or finding a unique vantage point to shoot from. Don’t be afraid to try out new techniques and approaches – the more you experiment, the more you’ll discover what works best for you. Be open to new experiences As a travel photographer, it’s important to be open to new experiences and to embrace the unknown. This might mean stepping out of your comfort zone and trying something new, or simply being open to the unexpected. Remember that the best photos often come when you least expect them, so be ready to seize the moment when it arrives. In conclusion, discovering the world through the lens of a camera is a journey that is filled with endless possibilities and endless opportunities for growth. By finding your own style, packing the right equipment, getting to know your destination, experimenting with different perspectives, and being open to new experiences, you can capture stunning and meaningful travel photography that tells a truly compelling story. So, it is a great way to discover the world and share your experiences with others. Latest Articles: How to create an engaging video script The Power of Mindset: How to Transform Your Life by Changing Your Thoughts How to Develop Communication Skills The Role of a Content Creator Discovering the World Through the Lens: A Photography Traveler's Journey How to start in Videomaking The essentials of lighting for Videomaking The secrets of street photography: Capturing wonderful moments on the go The art of storytelling in videomaking How to create a video marketing Strategy
The secrets of street photography: Capturing wonderful moments on the go

The secrets of street photography: Capturing wonderful moments on the go Street photography is a unique and challenging art form that captures the candid moments and real-life experiences of people on the street. It requires a keen eye, a quick and decisive shooting style, and the ability to capture fleeting moments of beauty and emotion. Here are some tips and techniques for capturing stunning street photography on the go. First, it’s important to be discreet and unobtrusive. Street photography is all about capturing real and unplanned moments, and if your subjects are aware of your presence, they may act differently and the resulting photos may not be authentic. To avoid drawing attention to yourself, use a small and discreet camera, shoot from the hip or the chest, and avoid making direct eye contact with your subjects. Second, be prepared and ready to shoot at all times. Street photography is all about being in the right place at the right time, and you never know when a beautiful or interesting moment will present itself. So make sure your camera is charged and ready to go, and keep it with you at all times. Third, pay attention to the light. Light is an essential element of photography, and it can greatly affect the mood and atmosphere of your street photos. Look for interesting lighting situations, such as backlighting, sidelighting, or harsh contrast, and use them to create visually striking images. Fourth, look for interesting subjects and compositions. Street photography is all about capturing unique and unexpected moments of everyday life, so keep your eyes open and look for interesting subjects, scenes, and compositions. This could include interesting people, candid moments, or unusual perspectives. Fifth, experiment and try new things. Street photography is a constantly evolving and creative art form, so don’t be afraid to experiment and try new things. This could include shooting with different lenses, using different camera settings, or trying out new post-processing techniques. By experimenting, you can develop your own unique style and approach to street photography. In conclusion, the secrets of street photography are to be discreet, prepared, and creative. By mastering these techniques and staying open to the unexpected, you can capture stunning moments and real-life experiences on the go. Latest Articles: The secrets of street photography: Capturing wonderful moments on the go The art of storytelling in videomaking How to create a video marketing Strategy Why you should read "Rich Dad, Poor Dad" Pictory.ai: The Evolving Video Maker for Creatives